
ChatGPT 換背景提示詞:12 條 background change prompt 覆蓋證件照到電商白底
先說個認知誤區:很多人以為"換背景"是一條指令能通吃的事,布光這行幹久了才知道,純色底、場景合成、產品白底,這三種背景在燈位邏輯上根本不是一回事——光源方向、陰影投射角度、邊緣過渡,每種處理方式都不一樣。指令寫得再長,如果沒分清楚是哪一類需求,出圖照樣穿幫。
這篇把 chatgpt background change prompt 按四類場景拆開講,每類給 2-4 條可以直接抄的指令。
純色底:證件照與標準像
證件照和標準像對背景色的要求是"純淨無漸變",這類 photo background change prompt 最忌諱模型自作主張加陰影或漸變。
1. "Replace the background with a solid pure white background, no gradient, no shadow, keep the subject's edge hard and clean."(替換成純白背景,無漸變無陰影,主體邊緣保持清晰硬朗)
2. "Change the background to standard passport photo blue (RGB 0,71,171), keep lighting on the face flat and even, no strong shadows."(換成標準證件照藍底,面部光線保持均勻平坦,無明顯陰影)—— 證件照對"陰影"零容忍,這條比"藍色背景"這種模糊描述靠譜得多,寫清楚具體色值模型更容易對上。
3. "Change background to solid light gray, keep collar and shoulder edges sharp, do not add any drop shadow beneath the subject."(換成純淺灰背景,衣領肩部邊緣清晰,主體下方不要加投影)
像兩張證件照被一根線連成對話這類創作型證件照,底子用的也是這種純色無漸變邏輯,只是後期加了創意元素。
場景移植:把人放進新場景
這類需求的核心矛盾是光線方向要匹配——布光這行第一課就是"主光位置決定陰影位置",場景移植如果不管這條,人和背景一眼假。
4. "Move the subject into a golden-hour beach scene, match the warm side lighting on the subject to the sunset direction in the background."(把主體移入黃昏海灘場景,主體的暖色側光方向要匹配背景的日落方向)
5. "Place this person into an empty blue chair in the front row, keep the perspective and scale consistent with the row of chairs."(把這個人物放進前排空著的藍色座位,透視和比例跟整排座位保持一致)實際案例見最左邊藍色座位補齊,這種"合影補位"是場景合成裡最常見的需求之一。
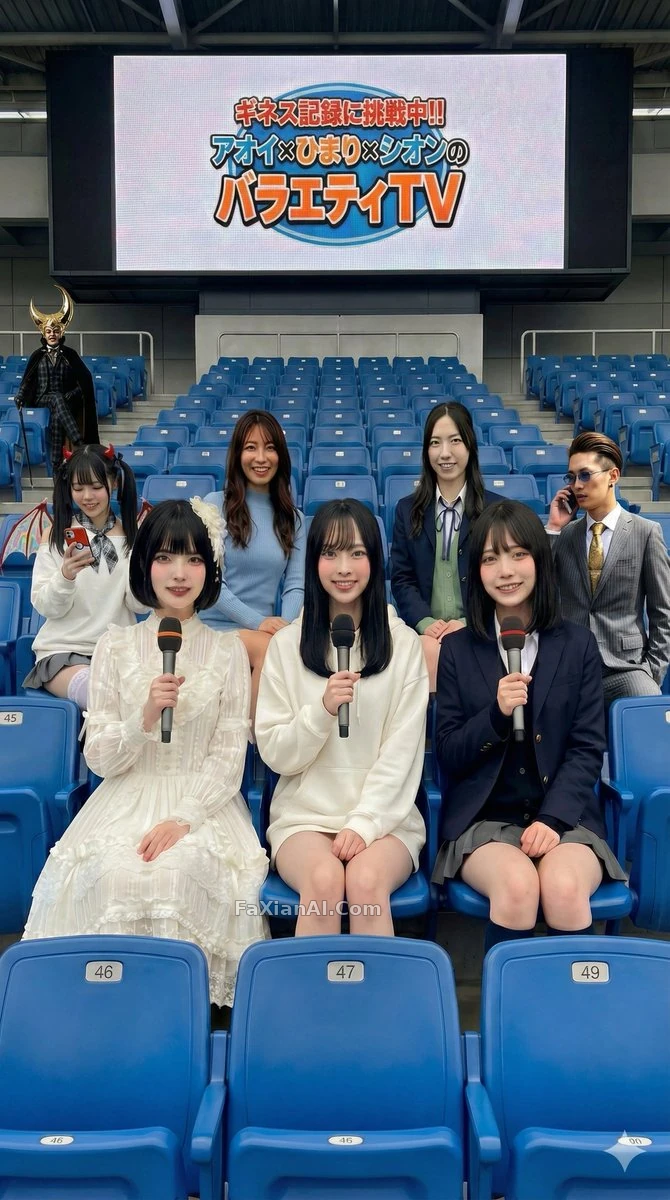
主體和新背景的比例差一點,整張圖就會顯假。檢視完整提示詞
6. "Change the background to a dim midnight blue interior, keep the subject's original lighting untouched so they read as lit separately from the room."(換成深夜藍色調室內背景,主體原有光線保持不動,讓人物讀起來像單獨打光)—— 這條反常識但實用:不是所有場景移植都要匹配背景光,舞臺感、懸浮感這類效果反而要故意讓主體光和背景光脫節。參考深色系背景替換。
7. "Remove the current background entirely and replace with a blurred bokeh cityscape at night, keep focus sharp only on the subject."(完全移除現有背景,換成虛化的夜景城市光斑,焦點只保持在主體上)
舞臺感場景合成,主體光源不必遷就新背景。檢視完整提示詞
電商白底:產品圖專用
產品圖對背景的要求跟人像完全不同,重點是"乾淨到沒有一絲幹擾",這條經驗來自天天被甲方退回"背景還有雜色"的產品圖。
8. "Change the background to a seamless white studio backdrop, add a soft gray reflection shadow directly beneath the product, no other shadows."(換成無縫白色影棚背景,產品正下方加柔和灰色反光投影,不要其他陰影)—— 電商圖跟證件照相反,這裡需要一點點投影製造"落地感",完全沒有投影反而顯得產品懸浮不真實。
9. "Remove all background clutter and replace with pure white, keep product edges crisp, no color cast from the background onto the product."(去除所有背景雜物換成純白,產品邊緣清晰,背景色不能反染到產品上)
產品圖的純白標準是零雜色、零色偏。檢視完整提示詞
10. "Change background to a light beige gradient studio backdrop, keep a subtle vignette, suitable for premium skincare product photography."(換成米色漸變影棚背景,帶輕微暗角,適合高階護膚品產品攝影)
11. "Swap the background to a minimalist marble surface, keep reflections realistic but not distracting."(換成極簡大理石臺面背景,反光要真實但不能搶眼)
12. "Batch-replace the background of all product photos in this set to the same pure white, keep each product's individual shadow direction consistent with a single overhead light source."(批次把這組產品圖背景都換成同一種純白,每張的投影方向都統一成頂部單光源的效果)批次處理最容易出的問題是每張圖光源方向各寫各的,統一在一條指令裡說清楚能省掉後面逐張對齊的功夫。
三個容易被忽略的細節
寫了十二條,回頭總結三個甲方最常反饋的問題:
邊緣毛刺——頭髮絲、衣物纖維邊緣如果不單獨強調"keep edge clean",容易殘留舊背景的色斑,建議加一句"no background color spill on hair/fabric edges"。
陰影邏輯反了——證件照要零陰影,電商圖要有意投影製造真實感,這兩條經常被新手寫反。
光線方向不統一——場景合成類如果不特別說明"故意脫節",預設都要讓主體光和背景光對上方向,這條本站提示詞萬能公式裡第三層"光線"講得更細,建議對照著看。
背景換完如果畫質模糊,可以配合照片變清晰提示詞一起用,順序建議先清晰化再換背景,反過來做容易把噪點也一起合成進新背景裡。想直接看更多換背景案例可以逛逛人像分類和電商產品分類,這些指令套在 Nano Banana 上效果也一致,首頁也有生成入口可以直接試。